Remove the Dirty Roll Filter
Jackmaster Bypass Filter - Top Off
A Jackmaster ByPass Oil Filter Continually Cleaning Lubrication Oil.
2005: Installed in 1990 VN Holden Commodore Sedan.

Micro-filter your engine oil and save on servicing costs. Cut back on engine wear. A Jackmaster bypass oil filter pays for itself.

This filter can also be used as an excellent fuel filter, due to its capacity to remove all water. Just remove the restrictor to allow free fuel flow.

The benefits of using a bypass oil filter in addition to the full flow filter are well known and well documented. A web search using the key words "bypass oil filter"will yield a lot of information. Check out the Gulf Coast Oil Filter web site and read about the Peterbilt truck that did 1 million miles on one oil change.
 
When the motor was stripped it had less engine wear than an engine that had been serviced regularly with no bypass oil filter installed - amazing but true. Whether you have a classic car or modern engine, Jackmaster oil filters will work for you. Here's a great filter that really works and at a budget price
 
The Jackmaster Bypass Filter: 
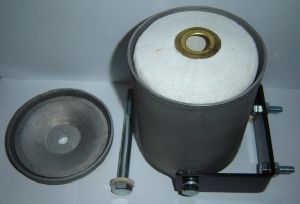
  • This budget-priced metal filter container is made from high pressure die cast aluminum and is brand new! 
  • The cannister is expensively coated in a dark grey powder coated finish and the sealing edges are machined.
  • A threaded steel sleeve is located in the base to take the lid holding bolt. This sleeve is counter-sunk for easy location of the bolt.
  • Oil inlet and outlet fittings are standard 1/4 inch BSP fittings.
  • The oil outlet contains a 1.5mm restrictor orifice which allows sufficient oil to pass while maintaining engine oil pressure. 
  • High quality field fit 're-usable' hose fittings are available on request to allow fitting any where.
  • High quality steel reinforced hose is available on request at a budget price.
  • A tightly wound paper element enclosed in a cotton bag with a metal eyelet for easy removal, is supplied FREE of charge.
  • The filter unit can be fitted anywhere on a vehicle - hose length is not a problem.
  • Fitting instructions are available on the website with photographs of interesting installations to be added as they come to hand. 
Changing the bag filter is easy. Simply unscrew the top, pull out the old filter, push in the new one and then replace the lid. no more dirty oil changes. If you run out of the recommended filters, then a tightly wound toilet roll will do the job although the elements supplied are specifically designed to do a good job. Filter elements are quite cheap and can last for around 15,000 km on a petrol (gasoline) or LPG car and about 8000 km on a diesel.
 
Bagged filter with metal eyelet for easy removal - you could change this filter in a dinner suit!
Rivet Nut before and after installation. 
This pic shows a rivet nut before and after it is compressed into position in a hole. Rivet nuts are available from bolt suppliers and tools can be hired from various bolt suppliers to install them. It is also simple to make up a small tool to install them.
 
The original Jackmaster Bypass Oil Filter installed in a 1990 VN Holden Commodore during the testing and development phase  (2005). Note: this one is not powder coated.
 
  
The important thing to know about bypass filters is that it is a user inter-active device. In other words you learn to use it with your application. This way you get the most out of it. You will develop your own element changing regime. If you have a diesel you will develop a time frame for the  removal of some oil via the swivel for new oil replacement. (See swivel return fitting info on page marked - Fittings - Tees, Sandwich, Swivel) In general, you will develop your own usage of the filter and in doing so you will notice a big difference in the cleanliness of your oil.
 
One very important thing to look at: It is not uncommon to find engines running at well above normal oil pressure. We don't use oil pressure guages anymore so it goes un-noticed. Sometimes we blame seals and other things for oil leaks when it could be the over-pressure. High oil pressure not only damages your engine and its components but it rapidly contaminates the oil and causes the engine to run at temperatures way above normal. By rights every engine should have an oil guage. If you have leaks, unusually dirty oil or high running temperatures, always check this.
 
 
Installation Instructions for Jackmaster Oil Regenerator
 
 
Install the cannister 
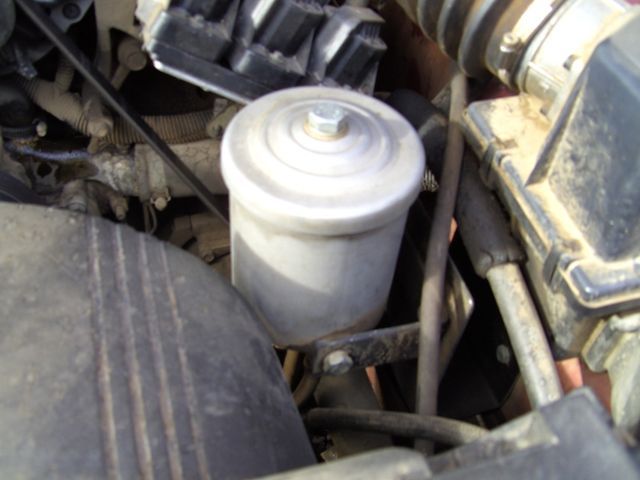
  • Locate a good position to install the unit in an upright position. Locating a good spot sometimes requires a bit of imagination as modern vehicles use up so much space under the bonnet. There is  more information on this subject further down on this page.
  • Fit the holding bracket and install the unit. It is sometimes useful to make up a thin, flat plate of steel to which the bracket may be attached.

Connect the hoses.

  • The pressure hose (supply hose) needs to be connected to the fitting at the base of the unit marked "In". This hose should be connected to a point on the engine where oil pressure is available. The most common point is at the oil pressure switch. A tee fitting may be used here which will enable the pressure switch to be re-installed, together with the supply hose to the regenerator unit. Various tee fittings are available to suit different makes of engines. A sandwich adaptor mounted between the full-flow filter and the engine provides an excellent supply fitting.

Oil return.

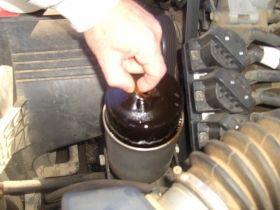
  • The other hose (oil return hose) is connected to the fitting marked "Out" and needs to be fitted so that oil can be returned to the sump. There are a number of ways to do this. (1) A swivel fitting is available from Jackmaster Oil Filters, to install into the oil filler cap by drilling a 10mm hole in the centre of the cap. This allows the cap to be undone without removing the return hose. This method is recommended as it allows flow to be checked with the engine running or the removal of oil, an important feature. (2) A fitting called a hollow nut is available from Jackmaster Oil Filters, which screws into a pre-pierced hole in the sump, just above th oil level. (3) The sump or tappet cover may be drilled in an appropriate position to allow the fitting of a "Nutsert" or "Rivet nut" These fittings are available from bolt or engineering supply houses. A very good supply point can be had by drilling into the body of the full flow filter. The full flow filter rarely needs to be changed if you are using bypass filtration, as the oil remains clean and the full flow filter simple remains as primary protection. A "Nutsert can be used here also. You could have two or three full flow filters done at the same time for future use. Another fitting is available to be silver soldered onto the dipstick which is also a good return point.
  • Make sure that your hoses are securely tied and the installation is done to your satisfaction.
  • Check that there is an element in the unit and run the engine until the filter body warms up. This indicates that oil is flowing through the the unit. This is where the swivel fitting is useful for checking the oil flow.

Swivel return fitting.

  • If the swivel fitting is used (recommended) it is best fitted to oil caps which are either flat or slightly domed on top. Some caps are formed for finger grip on top which can interfere with fitting the swivel, although, in most cases it can still be fitted. A 10mm hole is drilled in the centre of the cap. The swivel stem is then inserted into the cap with the spacing washers on top to distance the hose fitting from the cap. The rubber seal is then placed inside the cap followed by the larger steel washer. Now the Nyloc nut is screwed onto the stem. It is only necessary to tighten the nut enough to make the swivel firm but still retain unrestricted turning motion. The rubber seal does not need to be compressed very much. A more complete instruction for installing the swivel fitting is available on the page headed, "Products - Tee pieces & Swivel " and the page headed, "Cleaned Oil Return".

Re-useable hose fittings.

  • If re-useable (field fit) hose fittings are used the following applies. This fitting comprises two pieces - the centre fitting, which inserts into the hose end, and the ferrule, which is fitted over the end of the hose. The best way to cut steel wire reinforced hose is by using an electric abrasive saw with an ultra thin cutting wheel. These wheels are only 1.3mm thick and do a nice smooth cut. They are very cheap to buy at the local hardware store and can be used in an abrasive cutoff saw or an electric drill if you have the attachment. The cutoff saw is the easiest to use and performs a nice square cut. The end of the hose must be prepared by removing any outstanding edges on the cut end which would impede the installation of the ferrule. Do not remove the rubber or textile covering from the wire braid. On some hose it is helpful to grind a shallow bevelled angle on the end of the hose, just through the wire braid and tapered back for about 10mm. If the ferrule screws on to the hose without doing this, then that's OK. Next, oil must be applied on the end of the hose and also inside the ferrule. The ferrule is then screwed onto the hose in an anticlockwise direction - the ferrule thread is left handed. Screw it until the hose end bottoms inside the ferrule and then back it off about 1/2 of a turn, enough to leave a clearance of about 1mm or so at the end of the hose. Now apply some oil inside the hose end and also on the thread of the fitting. This thread is right handed so screw it in a clockwise direction.  Push it into the hose until it contacts the thread in the ferrule, then screw it into the ferrule until it bottoms and locks firmly against the ferrule. This provides a hose fitting that will survive enough pressure to burst the hose without detaching. The quality and pressure rating of this hose obviously exceeds the pressure requirements of the filter. However, it is essential to use steel braided hose to provide the best connection with field-fit fittings. Also, the steel braiding provides a quality installation which will resist the onset of brittleness in the hot environment of the engine compartment. A quality hose and fitting should guard against any chance of oil loss for a long operational period.

Nutserts.

  • For information on the installation of nutserts there is a very good article I downloaded from the web, to be found on the page headed "Cleaned Oil Return". There is more information on an installation tool lower down on this page.
  • For any other information look at the various pictures and details on this website. The site will be upgraded continually with information and photos of various customer installations from around the world.  
Fault Finding
 
There is not a lot that can go wrong with the Jackmaster filter. It has been designed with absolute simplicity in mind and the design has weathered many years of use in various applications. The result is that it has been found to be quite robust and trouble free. The following points are a guide to solving any problems that may emerge during the operation of the filter.
Filter Not Working
If your filter is not working you should first check if the used roll displays the deep impressions formed by the bottom rack. If these are not evident then there is no downward pressure on the element.
1. Check to see if you have discarded the bottom cone seal when removing a used roll. If this is the case then oil is simply flowing from the input port across to the outlet port and you will need to replace this cone seal to seal the centre core of the element.
2. If no oil flow is exiting the filter the pressure orifice may be blocked. The element rack may have been re-installed upside down and may be blocking the outlet orifice which is only 1.5mm diameter. This is one of the good points about using the swivel return fitting in the oil filler cap.
 
3. The outlet orifice may be blocked by some detritus. You can blow back along the return hose with an air compressor to clear it. Just a short burst will do it. This is one of the good points about using the swivel return fitting. It is so easy to check oil flow and then so easy to blow back through the fitting without having to remove any hose connections. The design is fairly simple and easy enough to maintain.
 
Oil Leaks.
 
If the lid seal is leaking you may apply moderate tension to the centre bolt and this usually stops any leak. It is a square section embedded seal and can take a lot of force, however, do not overtighten as this will only cause a worn seal to distort and leak more. If the leak persists change the seal. We supply replacement seals, but if you are in a situation where you need a seal quickly, an "O" ring will do the job nicely. When using an "O" ring a lot less tension needs to be applied to the centre bolt.
 
The sealing system for the centre bolt has been found to be the most reliable method. It is important to make sure that the steel washer on top of the rubber sealing washer is not inverted. You will notice that the edges of the steel washer are slightly rounded from being punched out during manufacture. This side of the steel washer must face the rubber seal while the flat side of the steel washer must face the bolt head. The underside of the bolt head has been machined dead flat to create a metal to metal seal against the washer.
 
If the centre bolt seal persists in leaking it can be replaced with a genuine Jackmaster seal or a fibre washer will work. A felt washer does a good job also. If there is weeping between the bolt head and the steel washer it may be just a simple matter of loosening the bolt and wiping the bolt head and the washer clean. That can stop the problem.
 
Suspected blockage of the restrictor orifice.
The filter works on the principle that the unit is pressurised. Oil pressure is maintained by a 1.5mm restrictor orifice inside the base of the filter body. This restrictor is on the outlet side. Oil pressure holds the element down onto the bottom cone seal and so it is important to make sure that the correct "In" and "Out" connections have been observed. The filter rack which supports the element is removable by taking out the cone seal. This is best done by using a pair of long nosed pliers and gripping one of the segments of the filter rack. The filter rack may then be pulled up, taking the cone seal with it. If the filter is not doing its job this is one of the first things to check. Sometimes, in applications where there is a high carbon load, such as diesels (especially when using an exhaust brake), it is possible for a thick sludge to build up in the bottom of the filter canister, which is too heavy to exit the small hole, thus blocking the flow. It is a good idea to check this occasionally, especially in diesel applications. Don't assume the filter is flowing by relying on the fact that the oil filter body is getting hot when you run the engine. This is one of the main reasons to use the swivel fitting return through the oil cap. This method of return allows simple checking of the oil flow. Always push the centre of the element down tightly on the cone seal when changing the element. This was one of the reasons for adding the filter element retaining spring assembly as a spare part. By using this device, the element will be pushed tightly onto the centre cone even if you forget to do it. The spring assembly also allows the filter to work at any angle, even upside down. It also ensures that odd sized centre cores found in toilet rolls will not affect sealing to the filter base.


Fittings and standards.
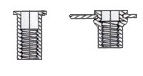
Jackmaster supplies fittings which are purchased from manufacturers and suppliers. We endeavor to maintain a level of quality and suitability that is acceptable to use for the purpose it is supplied. It is important that we let you know that problems can arise in the use of hydraulic fittings on motor vehicles. This area is complex in its diverse use of fitting sizes and variations within standards. We know it is a real headache to go scouting for fittings and while we try to supply fittings to do the job for you it is important to remind you that you are the installer and the onus is on you to make sure the installation is good.  We can advise to the best of our ability but the onus is on the installer to make sure and use due care and expertise in the installation. Ultimately the installer may have to source the occasional problem fitting. It's not all doom and gloom however and most of our customers get by with excellent installations. We are always ready to help to source that odd fitting if we can.
 
Always screw any part into the engine by hand and check its suitability before tightening with a spanner. 
  
 
Here is a link to a site showing pics of a very nice way to install rivet nuts.
 
Credit to Mike Kennedy for this information.
 
This is all you need to install the rivet nuts:
- A small strip of aluminum or steel (to use as a handle)
- A Long bolt that will thread into the rivnut (will be your mandrel)
- A nut for the bolt (for compression)
- A large washer (just to ease the operation)

Drill a hole in the strip of metal the same diameter as the mounting bolt. This strip of metal will serve as the "anvil" against which the rivet nut will be compressed. The length of the strip will allow you to hold onto it to keep it from turning during installation.

The bolt will serve as the mandrel.

The nut will be used to compress the rivet nut. Mark the nut with a reference point so you can keep track of how many rotations you will turn it during installation (I went three, seems to be just right).

I squirted the washer with a bit of WD40. This lubrication will allow the tightening nut to spin a bit easier.

Assemble the tool for installation.

To install the rivet nut, assemble the tool. Make sure your bolt is completely threaded into the rivet nut. (The bolt I have here is probably too long, harder to keep a hold of, but I wanted plenty of room to tighten the compression bolt.) Hand tighten place the rivet nut into the mounting hole.

When tightening, you will want to keep the bolt and anvil strip from turning. I positioned the anvil strip in a spot against the frame to keep it from turning and placed a wrench on the bolt (a socket would work too).

Making note of the reference mark you placed on the bolt, use a wrench to turn the nut clockwise to tighten the rivet nut. I went with 3 complete revolutions. Sorry I don't have a picture here - needed both hands to tighten the compression bolt.

To remove the tool, simply turn the bolt counter-clockwise to un-thread it from the rivet nut.

That's it! It worked great and best of all, it only set me back $2.82!
 
 
There is another article downloaded about Rivet nuts or Nutserts on the page marked "Cleaned Oil Return".  


Finding places to mount a filter.
 
Locating a good spot sometimes requires a bit of imagination as modern vehicles use up so much space under the bonnet. Something may have to be re-located to make room or the filter itself may need to be put in a remote place. There is nothing wrong with locating the filter as far away as the "Boot" or "Trunk" of the car. Long hoses simply increase the oil capacity and the cooling ability. In the Australian Ford Falcon, an ideal position to mount the filter is in front of the radiator. The grille is easily removable for servicing (a thirty second job when you have it set up and get used to it) and there is an added bonus of oil cooling available by using this position. There is enough space here to mount more than one filter, so you can mount another one here to serve the "Auto transmission". It is also conveniently positioned to access the auto transmission cooler line. This position is found on many vehicles. The Nissan Patrol, despite being a large vehicle, is fairly tightly packed under the bonnet, but a perfect spot can be found, on some models, in front of the radiator, just behind the front bumper bar. There is also an assortment of holes pre-existing there, to mount a bracket. There is no need to drill any more. When holes don't match up, simply make a small adaptor bracket to mount on those holes and adapt to the holes on the filter bracket. The filter bracket has been designed to be adapted to almost any situation. You can always space a flat plate out to clear the heads of the holding bolts. That way you can conserve lateral space. Incidentally, the filter only needs to be mounted vertically so that the element can be changed without oil spillage. It will work just fine in any position. If you need to mount it at any angle, even horizonally, you may do so. You could simply loosen the side support bolts and swivel it to a vertical position when changing elements.
 Some people have installed the unit behind the cab on commercial vehicles and mounted it on the chassis rail. I have seen a couple of very good installations where the battery was re-located into the back of the vehicle. (Boot, Trunk.) This clears a lot of space and gives you enough room for a dual mount for both engine and transmission filters. By using imagination it is always possible to mount a filter. Those people who are using them realise that bypass filtration is so important that it far outweighs the need to move something.
Back in the pioneering days of car and truck airconditioning, I used to design and manufacture air conditioning brackets and drive pulleys for auto and other mobile applications. On some major brand trucks built by well known truck companies I made space available by re-locating alternators, fuel filters or anything that needed to be moved. I used to refer to the process as "digging a hole", after all, the air conditioner was considered so important that it had to be fitted no matter what. In some cases those pulley and bracket designs were adopted by the foreign companies that manufactured the vehicles; so you see, moving something is no big deal and it is far simpler to mount a filter than something like an airconditioning compressor, which needs also to be driven.
Good luck with your installation; it is certainly a joy to stand back and behold your handiwork when the job is done.
From time to time I will be placing photos of installations on the site. 

Do you have problems with oil spillage when changing spin-on filter.


Many people experience difficulty with oil spillage when changing the spin-on filter or simply difficulty because of access. Their first thought is to fit a remote filter adaptor to make the filter more accesible. While this is cheap enough to do with standard filters it can be an expensive operation when using the more expensive spin-ons on Toyota and Mitsbishi engines. We do make adaptors for these engines but they are expensive so I encourage my customers to look at using a bypass oil filter and leaving the original filter in place on the engine.


This allows you to have very clean oil thus the original filter does not do any work. It can sit there for a very long time. The side benefits of doing this are far less frequent oil changes, better and smoother engine running, better fuel economy and much longer engine life with far fewer repairs required. The cost of a bypass filter is commonly around the same cost as an expensive remote system. You can even avoid doing oil changes indefinitely by doing partial oil changes. You simply pump out a litre of oil occasionally by using the swivel fitting that we supply in the oil cap. Undo the oil cap while the engine is running and fill a container (around a litre or half a litre) replace with new oil and tip the old oil into your diesel fuel tank. Diesels burn this oil without any problem. It is clean because it has been bypass filtered and will not give your injector system any problems. It will even act as a a good upper cylinder lube. Furthermore, you can do it as often as you wish because you are getting a refund for the oil in using it as fuel. Doing this you can avoid ever having to get under the vehicle again. Many people do this.